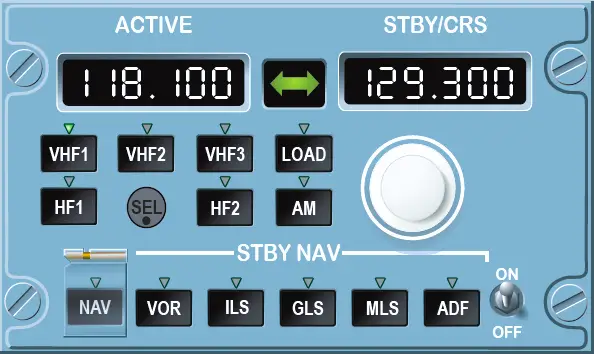
A320 RADIO MANAGEMENT PANEL
ON/OFF sw
This switch controls the power supply to the panel. RMP3 (if installed) is able to control VHF and HF transceivers through RMP1 and RMP2 even when either of the latter is OFF.
Radio com selection keys
When the pilot presses one of these keys:
- The ACTIVE window displays the frequency set on that radio.
- The STBY/CRS window displays the selected standby frequency or course.
- The selected key displays a green monitor light.
AM pushbutton
If the aircraft has HF radios and the flight crew has selected an HF tranceiver, this switch selects the AM mode. (The default mode is the SSB, or single side-band mode). This key displays a green monitor light when the AM mode is active.
SEL indicator
The SEL indicator on both RMPs comes on amber when a transceiver, normally associated with one RMP, is tuned by another:
- If 2 RMP installed:
- VHF1 ( VHF3 (if installed), HF1 (if installed)), tuned by RMP2,
- VHF2 ( HF2 (if installed)), tuned by RMP1.
- If 3 RMP installed:
- VHF1 tuned by RMP2 or RMP3,
- VHF2 tuned by RMP1 or RMP3,
- VHF3, HF1, ( HF2 (if installed)) tuned by RMP1 or RMP2.
NAV key (transparent switchguard)
- Pressing this key engages the radio navigation backup mode. It takes control of the VOR, ILS, GLS (if installed), MLS (if installed) and ADF (if installed) receivers away from the FMGC and gives it to the RMP.
- The green monitor light comes on.
- Pressing the NAV key a second time returns control of the navigation radios to the FMGC.
Note:
- The flight crew must select this backup tuning mode on both RMP1 and RMP2 if both FMGCs or both MCDUs fail. In the emergency electrical configuration, only RMP1 receives power.
- Pressing the NAV key on RMP3 (if installed) has no effect.
- In the NAV backup mode, the flight crew can select radio communication systems as it would in the normal mode. Setting one RMP to NAV backup mode removes navaids tuning from both FMGCs.
- When the flight crew uses an RMP to tune an ILS/DME or GLS (if installed) /DME or MLS (if installed) /DME, the PFDs do not display the DME distance.
STBY NAV keys
When the NAV key is on and the flight crew presses one of these STBY NAV keys, the ACTIVE window displays the frequency/channel to which that receiver is tuned. The green monitor light on the selected key comes on, and the one on the previously selected STBY NAV or COM key goes out.
Frequency/channel selector knob
Two concentric knobs allow the flight crew to preselect frequencies/channels for communication radios and stand-by navigation systems and select courses for VOR, ILS, GLS (if installed) and MLS (if installed). The desired frequency, channel or course is set in the STBY/CRS window.
The outer and the inner knobs set a frequency/channel: the outer knob controls the most significant digits, the inner knob controls the least significant digits. A rate multiplier speeds up the tuning when the knob is rotated quickly. The inner knob only sets a course.
Transfer key
The flight crew presses this key to interchange ACTIVE and STBY frequencies/channels. This action tunes the selected receiver to the new ACTIVE frequency/channel.
STBY/CRS window
The flight crew can make the displayed frequency /channel by rotating the tuning knob. The frequency/channel displayed in the window becomes the active frequency/channel when the flight crew presses the Transfer Key. If this window displays a course, then the ACTIVE window displays the associated frequency/channel.
Note: If the STBY/CRS window is displaying a course, then pressing the transfer key displays the active frequency/channel in both windows.
ACTIVE window
This window displays the frequency/channel of the selected navaid, which is identified by a green monitor light on the selection key.
LOAD FUNCTION (if installed)
The flight crew can load the VHF frequency from the CPDLC CONTACT/MONITOR messages to the STBY/CRS window.
BFO key (if installed)
If the ADF (if installed) is selected, pressing this key activates the BFO (Beat Frequency Oscillator). For most ADF, with BFO activated, the audio identification is heard. However there are some ADF where the BFO must be deactivated in order to hear the audio identification.