Marshalling is visual communication that guides pilots to turn, slow down, stop, and shut down engines, leading the aircraft to its parking stand or runway. It is a part of an aircraft’s ground handling.
Learn nonverbal (visual) communication between ground personnel and cockpit crew. Know the guidance signals for safe operations of Ground Support Equipment (GSE) around the aircraft.
- Marshalling hand signals for aircraft
- From a signalman to an aircraft
- From the pilot of an aircraft to a signalman
- Technical/servicing hand signals
A signalman may also be referred to as a marshaller.
At busier and better-equipped airports, marshallers are replaced on some stands with a Visual Docking Guidance System (VDGS). Sometimes, the marshaller indicates directions to the pilot by driving a “Follow-Me” car.
Visual Docking Guidance System (VDGS) is a system that gives information to a pilot attempting to park an aircraft at an airport stand via visual methods. This allows them to remain clear of obstructions and ensures that the aerobridge (Jet bridge) can reach the aircraft.
Meaning of Marshalling Signals
Marshalling signals are designed for use by the signalman, with marshalling bats or wands to facilitate observation by the pilot, and facing the aircraft in a position where best seen by the pilot. The wands may refer to daylight-fluorescent table-tennis bats or gloves (daytime only).
The standard meaning of Aircraft Marshalling Signals is prescribed by the ICAO in their Annex 2- Rules of the Air Regulations.
Signals made by Marshaller to Pilot
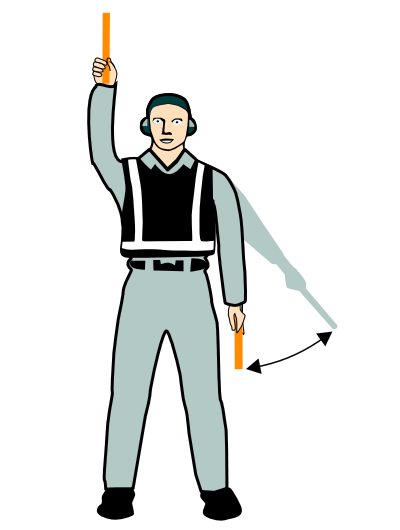
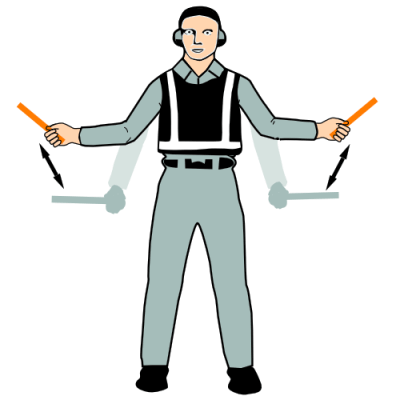
Wingwalker/Guide
Raise right hand above head level with wand pointing up; move left-hand wand pointing down toward the body.
This signal provides an indication by a person positioned at the aircraft wingtip, to the pilot/marshaller/push-back operator, that the aircraft movement on/off a parking position would be unobstructed.
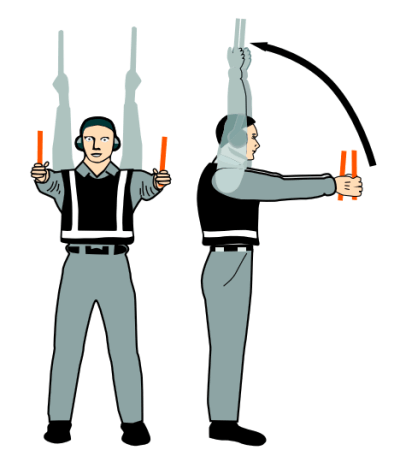
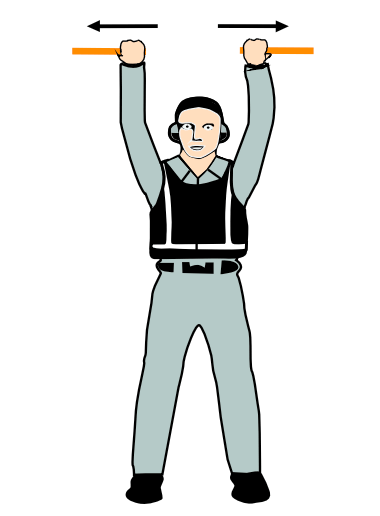
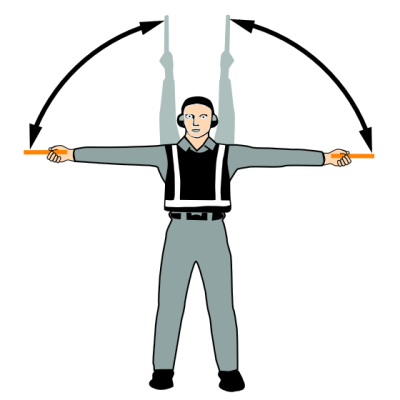
Identify gate
Raise fully extended arms straight above the head with wands pointing up.
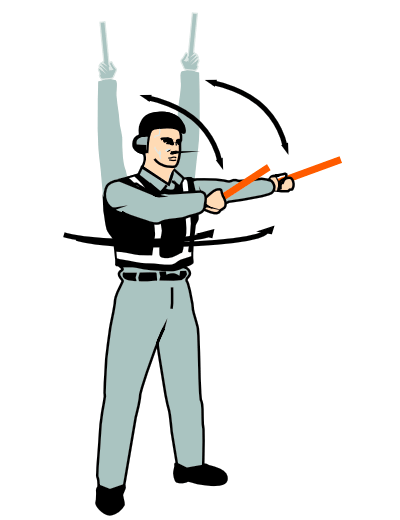
Proceed to the next signalman or as directed by tower/ground control
Point both arms upward; move and extend arms outward to sides of body and point with wands to the direction of next signalman or taxi area.
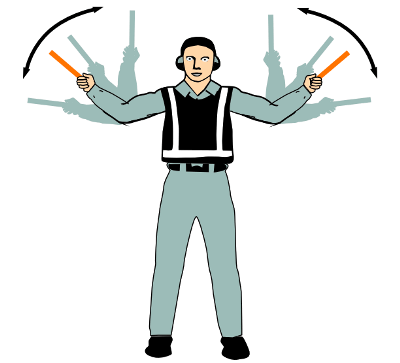
Straight ahead
Bend extended arms at elbows and move wands up and down from chest height to head.
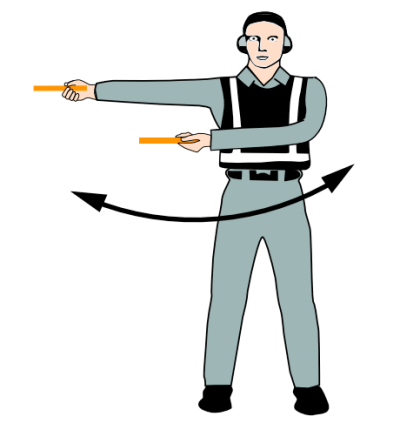
Turn left – from the pilot’s point of view
With the right arm and wand extended at a 90-degree angle to the body, make the “come ahead” signal with the left hand. The rate of signal motion indicates pilot the rate of aircraft turn.

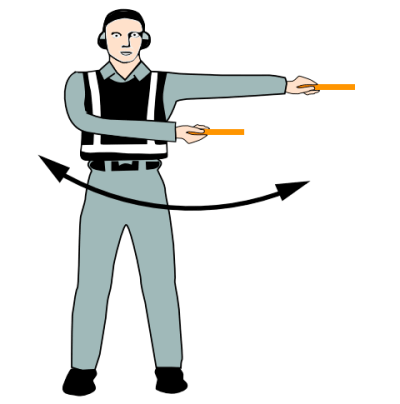
Turn right – from the pilot’s point of view
With the left arm and wand extended at a 90-degree angle to the body, make the “come ahead” signal with the right hand. The rate of signal motion indicates pilot the rate of aircraft turn.

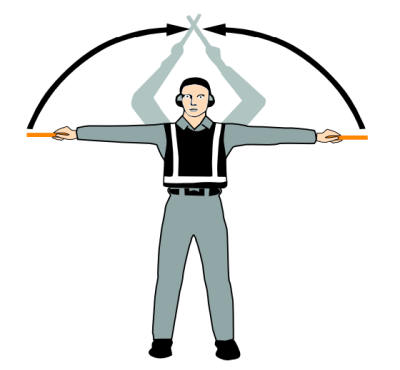
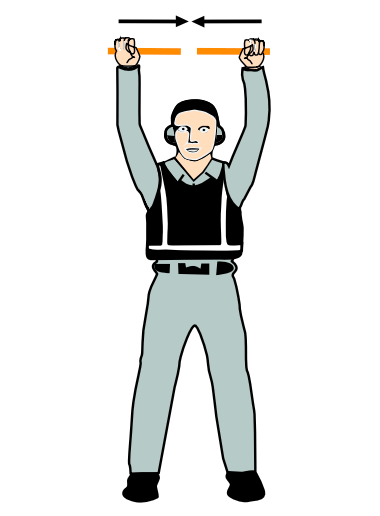
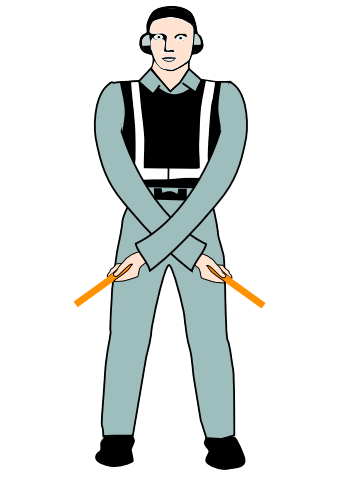
Normal stop
Fully extend arms and wands at a 90-degree angle to sides and slowly move to above head until wands cross.
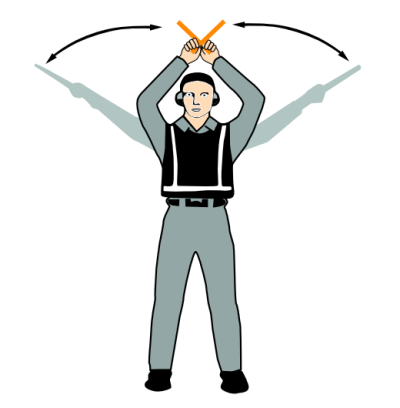
Emergency stop
Abruptly extend arms and wands to the top of the head, crossing wands.
Set brakes
Raise hand just above shoulder height with an open palm. Ensuring eye contact with the flight crew, close hand into a fist. Do not move until receipt of “thumbs up” acknowledgment from the flight crew.
Release brakes
Raise hand just above shoulder height with the hand closed in a fist. Ensuring eye contact with the flight crew, open palm. Do not move until receipt of “thumbs up” acknowledgment from the flight crew.
Chocks inserted
With arms and wands fully extended above head, move wands inward in a “jabbing” motion until wands touch. Ensure acknowledgment is received from the flight crew.
Chocks removed
With arms and wands fully extended above head, move wands outward in a “jabbing” motion. Do not remove chocks until authorized by the flight crew.
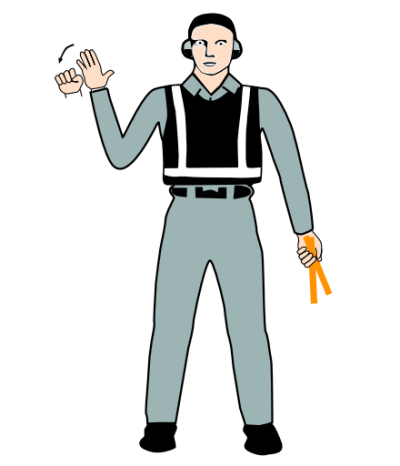
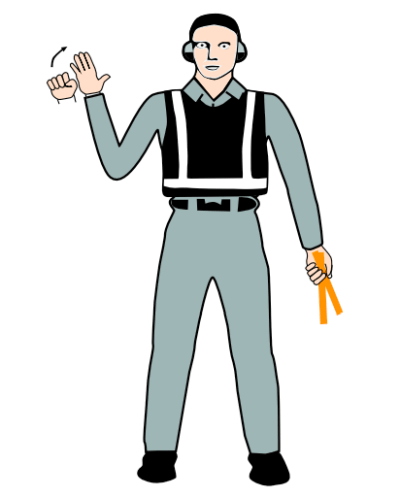
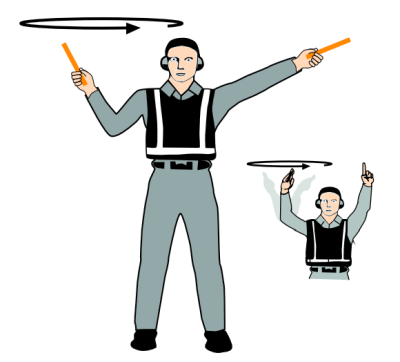
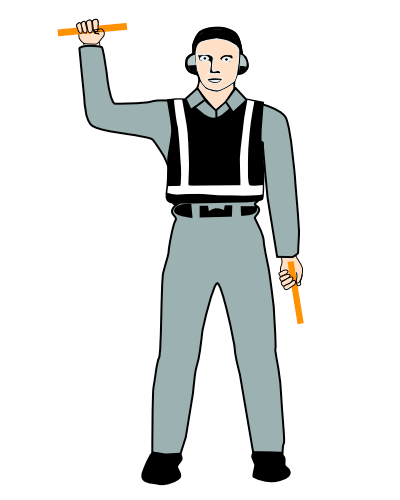
Start engine(s)
Raise right arm to head level with wand pointing up and start a circular motion with the hand; at the same time, with left arm raised above head level, point to the engine to be started.
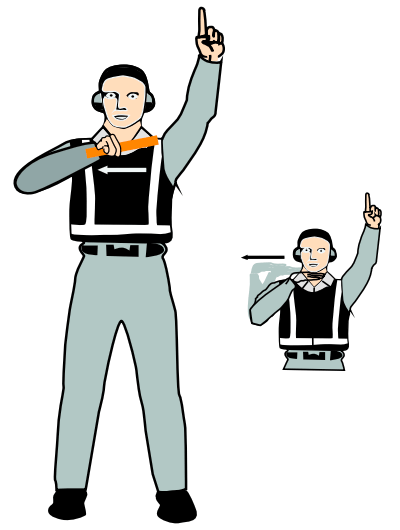
Cut engines
Extend arm with wand forward of the body at shoulder level; move hand and wand to top of left shoulder and draw wand to top of the right shoulder in a slicing motion across the throat.
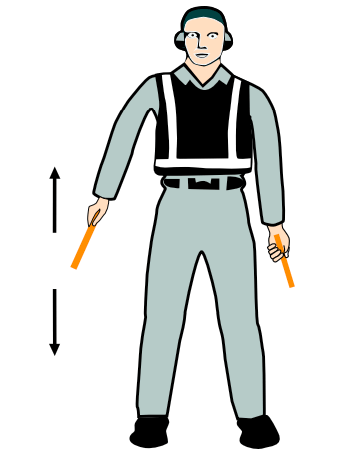
Slow down
Move extended arms downwards in a “patting” gesture, moving wands up and down from the waist to knees.
Slow down engine(s) on the indicated side
With arms down and wands toward the ground, wave either right or left wand up and down indicating engine(s) on left or right side respectively should be slowed down.
Move back
With arms in front of the body at waist height, rotate arms in a forward motion. To stop rearward movement, use the signal “Normal stop” or “Emergency stop”.

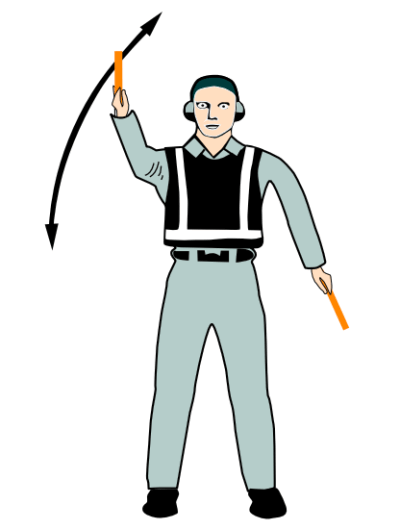
Turns while backing – for the tail to starboard
Point left arm with wand down and bring right arm from overhead vertical position to horizontal forward position, repeating right-arm movement.
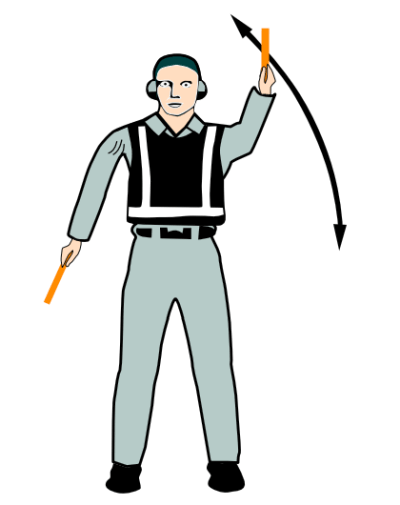
Turns while backing – for the tail to port
Point right arm with wand down and bring left arm from overhead vertical position to horizontal forward position, repeating left-arm movement.
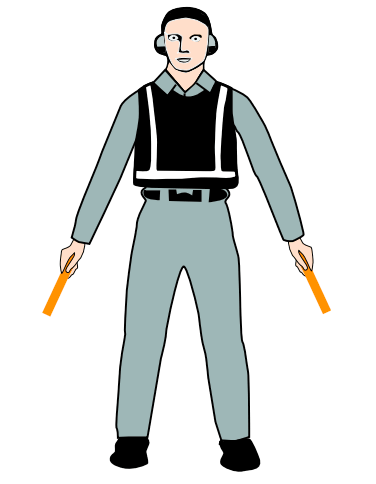
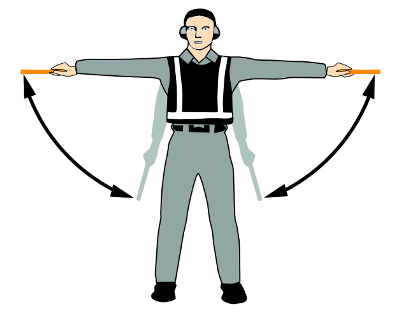
Hold position/stand by
Fully extend arms and wands downwards at a 45-degree angle to sides. Hold position until the aircraft is clear for the next maneuver.
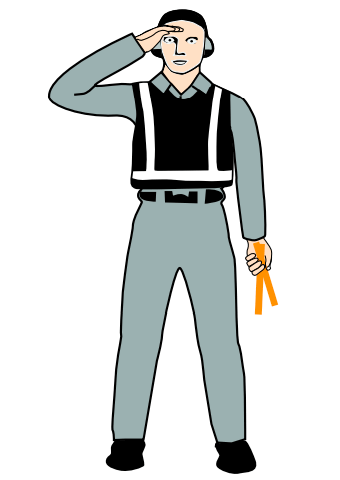
Dispatch aircraft
Perform a standard salute with the right hand and/or wand to dispatch the aircraft. Maintain eye contact with flight crew until aircraft has begun to taxi.
Signals made by Pilot to Marshaller
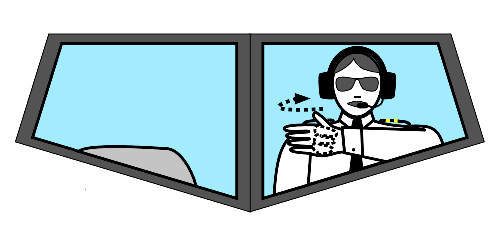
Brakes engaged
Raise arm and hand with fingers extended horizontally in front of the face, then clench fist.
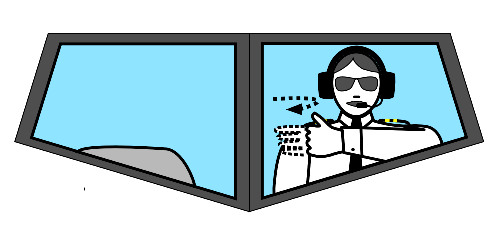
Brakes released
Raise arm with fist clenched horizontally in front of the face, then extend fingers.
Insert chocks
Arms extended palms facing outwards, move hands inwards to cross in front of the face.
Remove chocks
Hands crossed in front of the face, palms facing outwards, move arms outwards.
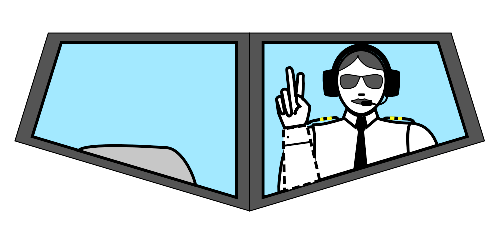
Ready to start engine indicated
Raise the number of fingers on one hand indicating the number of the engine to be started. For this purpose the aircraft engines shall be numbered as follows, No. 1 engine shall be the port outer engine, No. 2, the port inner engine, No. 3, the starboard inner engine, and No. 4, the starboard outer engine.
Signals designed for use to hovering helicopters
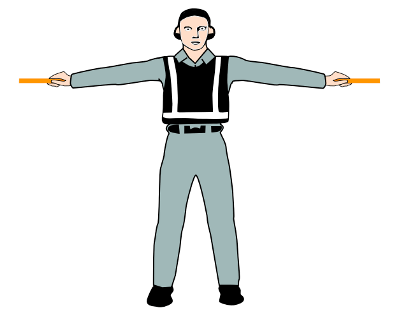
Hover
Fully extend arms and wands at a 90-degree angle to sides.
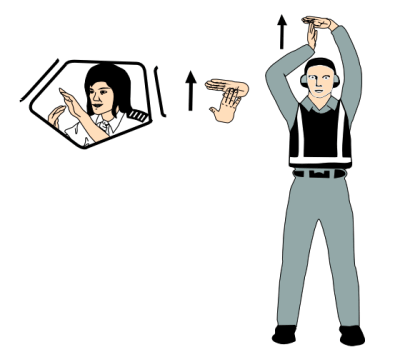
Move upwards
Fully extend arms and wands at a 90-degree angle to sides and, with palms turned up, move hands upwards. Speed of movement indicates the rate of ascent.
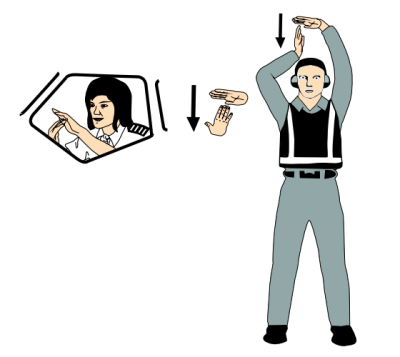
Move downwards
Fully extend arms and wands at a 90-degree angle to sides and, with palms turned down, move hands downwards. Speed of movement indicates the rate of descent.
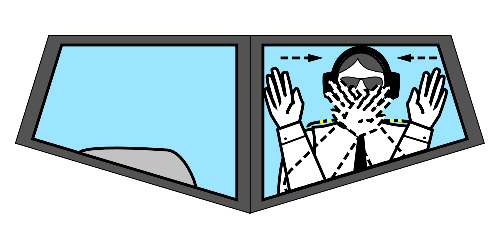
Move horizontally left – from the pilot’s point of view
Extend the arm horizontally at a 90-degree angle to right side of the body. Move other arm in the same direction in a sweeping motion.
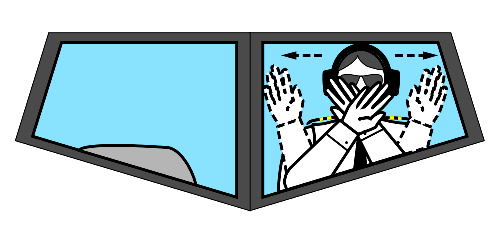
Move horizontally right – from the pilot’s point of view
Extend the arm horizontally at a 90-degree angle to left side of the body. Move other arm in the same direction in a sweeping motion.
Land
Cross arms with wands downwards and in front of the body.
Technical/servicing hand signals
Manual signals should only be used when verbal communication is not possible with respect to technical/servicing signals. Also, signalmen must ensure that an acknowledgment is received from the flight crew.
Do not touch controls
Extend the right arm fully above head and close fist or hold the wand in horizontal position; left arm remains at side by the knee.
Connect ground power
Hold arms fully extended above the head; open left hand horizontally and move finger tips of the right hand into and touch open palm of the left hand (forming a “T”). At night, illuminated wands can also be used to form the “T” above the head.
Disconnect ground power
Hold arms fully extended above the head with finger tips of the right hand touching the open horizontal palm of the left hand (forming a “T”); then move right hand away from the left. Do not disconnect power until authorized by the flight crew. At night, illuminated wands can also be used to form the “T” above the head.
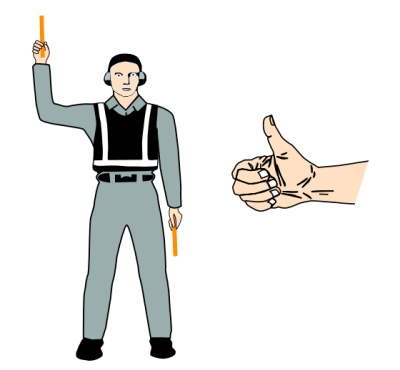
Affirmative/all-clear
Raise right arm to head level with wand pointing up or display hand with “thumbs up”; left arm remains at the side by the knee.
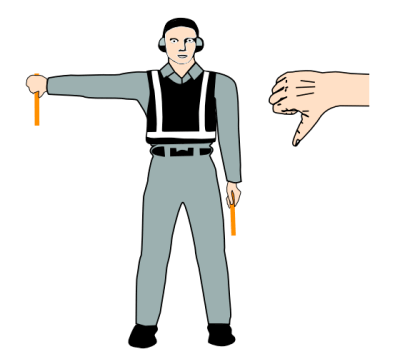
Negative/not-clear
Hold right arm straight out at 90 degrees from shoulder and point wand down to the ground or display hand with “thumbs down”; left-hand remains at side by the knee.
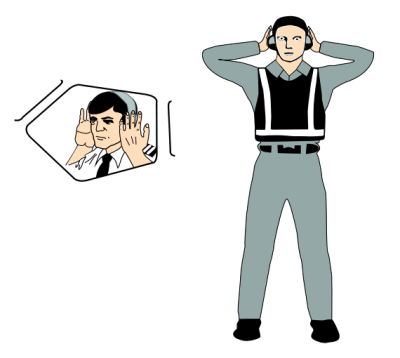
Establish communication via interphone
Extend both arms at 90 degrees from the body and move hands to cup both ears.
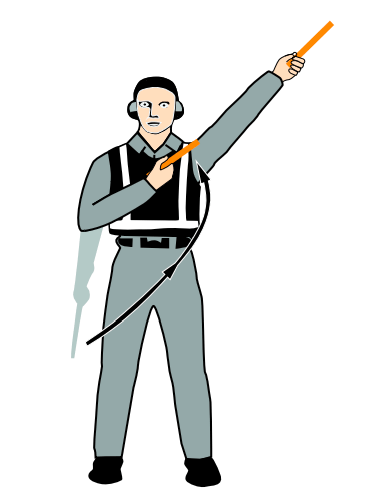
Open/close stairs
With the right arm at the side and the left arm raised above the head at a 45-degree angle, move the right arm in a sweeping motion towards the top of the left shoulder. This signal is intended mainly for aircraft with a set of integral stairs at the front.
Key points to note
- The signalman will be responsible for providing standard marshalling signals to aircraft in a clear and precise manner using the signals prescribed by the ICAO Annex 2 (Rules of the Air) to the Convention on International Civil Aviation.
- No person will guide an aircraft unless trained, qualified and authorized by the CAA approved organization, to carry out the functions of a signalman.
- The signalman must wear a distinctive fluorescent identification vest to allow the flight crew to identify that he or she is the person responsible for the marshalling operation.
- Daylight fluorescent-coloured wands, table-tennis bats or gloves must be used for all signalling by all participating ground staff during daylight hours. Illuminated wands must be used at night or in low visibility.